
Attendance
Mark daily student and staff attendance, keep the school calendar, print attendance reports, and connect biometric, card and Staff app self-attendance.
The Attendance module keeps the daily register for students and for staff, and the school calendar that decides which days are open. Attendance can be marked by hand in the ERP, by class teachers from the staff portal or Staff app, from biometric or card machines at the gate, and by staff marking themselves present from the Staff app. Families see their child's attendance in the Parent portal and app, and payroll reads staff attendance.
Before you start#
- Your role needs the Attendance permission. Setting up devices needs General Settings.
- Classes, sections, students and staff must exist in the session chosen in the sidebar.
- Mark holidays and weekly days off first (see Keep the school calendar below), because closed days cannot be marked.
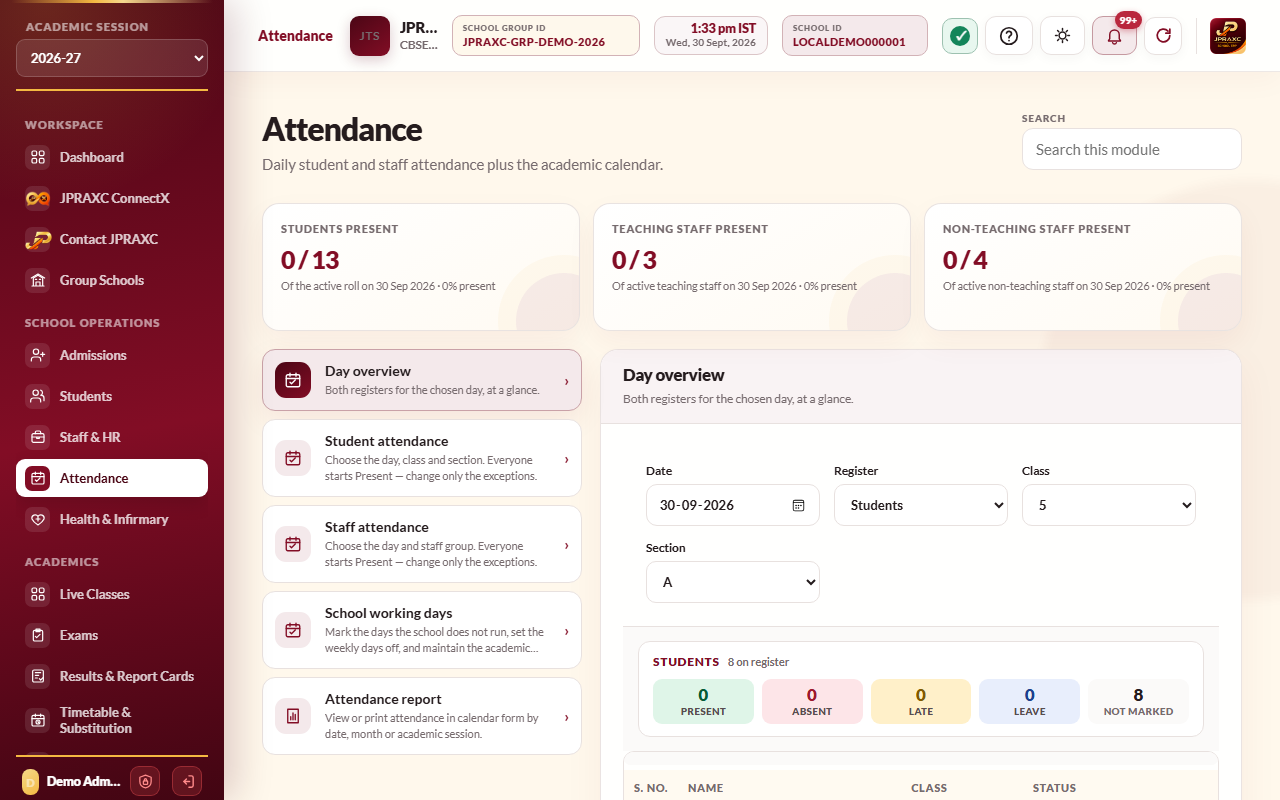
The module has five panes: Day overview, Student attendance, Staff attendance, School working days and Attendance report. The figure cards at the top show how many students, teaching staff and non-teaching staff are present on the chosen day.
Mark student attendance#
- Open Attendance › Student attendance.
- Check the Date.
- Choose the Class and Section. The register loads.
- Everyone starts as Present. Change only the exceptions to Absent, Late or Leave, and add Remarks if needed.
- Select Save attendance.
Mark all present sets every name back to Present before you save.
Mark staff attendance#
- Open Attendance › Staff attendance.
- Check the Date and choose the Staff group (All staff, Teaching or Non-teaching).
- Change the exceptions to Absent, Late, Leave or Half day. Enter In and Out times if you record them.
- Select Save attendance.
Approved staff leave is written into the staff register automatically. See Staff leave.
Check the day#
Attendance › Day overview shows, for a date and a class, section or staff group, how many are Present, Absent, Late, on Leave, on Half day and Not marked, with each person's status. It is read-only; marking is done in the two register panes.
Keep the school calendar#
Every date is an open school day unless you mark it otherwise. Closed dates cannot be marked for students or staff, and payroll does not count them as open days.
Open Attendance › School working days.
Close or reopen one date:
- Set the Date.
- Tick School closed and type the Reason / label (for example Holi). Untick it to open the date again.
- Select Save school status.
Set the weekly days off:
- Under Weekly school days off, tick the days (for example Sunday).
- Select Save weekly days off.
Mark a range of dates:
- Set From date and To date.
- Choose the School status: School closed, Holiday, Open · examination or Open · clear the marking.
- Type the Reason / label and select Apply school calendar range.
The calendar table below lists every date you have marked.
Print an attendance report#
- Open Attendance › Attendance report.
- Choose the Register (Students or Staff).
- For students, choose the Class and Section; for staff, the Staff group. Choose one Name or leave All names.
- Choose the Period: A month, A single date, or Whole academic session. For the whole session, untick any months you do not want.
- Select View attendance report. It opens in calendar form, ready to print.
Attendance from the staff portal and Staff app#
- A class teacher can mark their own class's register from the staff portal or the Staff app when their account has Mark class attendance ticked. It is the same register the office sees.
- A member of staff can mark their own attendance from the Staff app when self attendance is switched on (below) and their account has Self attendance from the Staff app ticked.
See Staff and HR for these permissions.
Biometric and card machines#
Fingerprint, face and RFID card machines at the school gate can mark attendance for students and staff.
- Open General Settings › Attendance configuration and choose the School tab.
- Find Student biometric & card or Staff biometric & card.
- Tick Use a biometric device for this register, or Take this register's attendance from RFID cards, or both.
- Your device supplier or technician enters the device details shown in the form, following the instructions on the pane. The pane lists the supported fingerprint and card devices.
- Under What a punch means, set the times your school uses: Count punches from, Late after, Grace minutes, Absent after, Half day if arriving after, Half day if leaving before, Day ends after, Minimum day (minutes) and the weekly offs.
- Under How it reaches the register, choose whether to Apply these rules to the register, Mark anyone with no punch at all as absent, Let device punches overwrite a manually marked status, and Accept automatic punches pushed by the device.
- Select Save biometric configuration.
- Test with one person's punch and check it in Day overview before using it for everyone.
For card attendance, enter each person's card number in RFID card no. on their student or staff record. For fingerprints, the staff record's Biometric code can be used to match punches.
When rules are in force, the register pane shows a line saying which machine's rules apply.
The Hostel tab sets up the hostel gate machine, which marks the hostel roll rather than the school register. See Hostel.
Staff self-attendance from the Staff app#
- Open General Settings › Attendance configuration and choose the Self attendance tab.
- Tick Staff may mark their own attendance from the Staff app.
- Type the Place (for example Main campus gate).
- Set the school's Latitude and Longitude: select Use this computer's location when you are at the school, or copy the numbers from a map.
- Set the Radius (metres). Punches are accepted only inside this circle.
- Choose whether The phone must verify the face or fingerprint before every punch, whether Punches are accepted only from the phone the person registered, and whether A second punch of the day is the time out.
- Select Save self attendance settings.
Each person registers once from their own phone. Registrations lists who has registered; select Reset registration when someone changes their phone. Recent punches lists every self-attendance punch with its time and distance from the school.
Good to know#
- All dates and times are IST. Machine punches are shown as the school's local time.
- A saved register can be opened again for the same date and corrected.
- Families see the attendance the school records; see Mobile apps.
Troubleshooting#
| Symptom | What to do |
|---|---|
| Attendance is closed for this date | The date is a holiday, a closure or a weekly day off. Change it in School working days if the school is open. |
| The register is empty | Choose the class and section (or staff group) and check the date and the sidebar session. |
| A status changes by itself when saved | A device's timing rules are in force for that register. Check General Settings › Attendance configuration. |
| Punches do not arrive from a machine | Ask your device technician to check the machine against the instructions on the Attendance configuration pane. Check Accept automatic punches pushed by the device is ticked. |
| A member of staff cannot punch from the Staff app | Check self attendance is switched on, their account has Self attendance from the Staff app ticked, and they are inside the radius. If they changed phone, reset their registration. |
