
Set up a gateway in Payment Configuration
The Payment Configuration screen, step by step - cards, test and live credentials, the addresses to register, and going live.
Every payment gateway is connected on one screen: General Settings › Payment Configuration. This guide explains that screen once. Each gateway's own guide then tells you which keys to fetch from that gateway's dashboard and which boxes they go in.
Before you start#
- Only the school administrator can open and save Payment Configuration.
- Have the gateway's test keys ready first. You will add the live keys after a successful test.
- Keep the keys in a safe place while you work. Do not send them by e-mail or chat. See Keep your gateway keys safe.
What is on the screen#
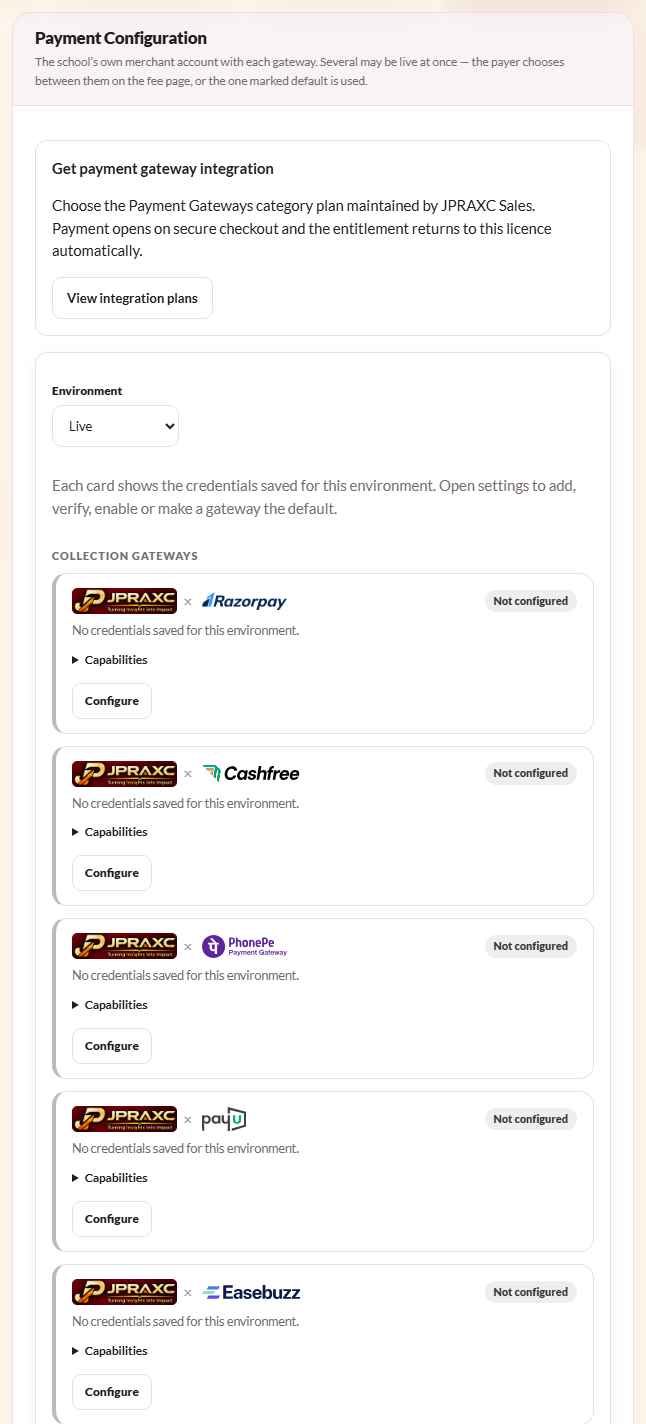
- The integration card at the top says Payment gateway integration is active or Get payment gateway integration. If it is not active, View integration plans opens the plan for this licence.
- Environment: a list above the cards with Live and Test / sandbox. Each card shows the credentials saved for the environment you pick.
- Collection gateways: one card per gateway. The pill on each card shows its state: Not configured, Disabled, Test mode or Live. The live default shows Live · default.
- Payroll payout accounts: cards for staff salary payouts. They do not collect fees.
- Each card has Configure (or Open settings once something is saved) and, once saved, Enable for new payments or Disable for new payments.
Configure opens the gateway's settings panel below the cards. The panel shows the gateway's logo, its status, Test environment and Live environment buttons, a link to the gateway's Official setup documentation, the gateway's Merchant setup requirements, and the credential boxes.
Steps: connect a gateway in test mode#
- Open General Settings in the sidebar, then Payment Configuration.
- Set Environment to Test / sandbox.
- On the gateway's card, select Configure.
- In the panel, make sure Test environment is selected.
- Paste each value from the gateway's dashboard into the box with the same name. Boxes marked * are required.
- Leave Enable and use this gateway for fee payments unticked while you test. A test payment does not need it.
- Select Save settings. The message Payment configuration saved confirms it.
- Look below the form for the addresses the gateway needs: Webhook URL, Return URL, or both. Select Copy Webhook URL or Copy Return URL and register each one in the gateway's dashboard, in the test mode of that dashboard. The gateway's own guide says where.
- If the panel has Test connection, select it. It checks that the gateway accepts the keys. It does not make or confirm a payment.
- Select Start sandbox payment and follow Test a payment end to end.
Steps: go live#
- Make sure the gateway has approved your merchant account for live payments.
- Open the gateway's settings panel and select Live environment.
- Paste the live keys. Live and test keys are stored separately; never mix them.
- Tick Enable and use this gateway for fee payments.
- Decide the school-wide choices on the same form:
- Make this the default gateway for new payments: the default is listed first for parents, and it is the only one offered when payer choice is off.
- Let payers choose among all enabled gateways (otherwise only the default is offered).
- Allow partial fee instalments: parents may pay less than a full instalment. A late fee is added only when an instalment is paid in full.
- Select Save settings.
- Copy the live Webhook URL and Return URL shown now, and register them in the gateway's dashboard in live mode. Live has its own addresses; the test ones do not carry over.
- Check the card. Set Environment to Live and look for Live or Live · default.
Good to know#
- Blank credential boxes keep what is already saved. A saved box shows Saved — leave blank to keep. Saved secrets are never shown again, even to the administrator.
- The addresses change whenever you save changed keys. After changing keys, copy the addresses again and update them in the gateway's dashboard.
- If a gateway shows no Webhook URL or Return URL after saving, there is nothing to register for it. The ERP still confirms every payment by checking with the gateway.
- If you switch off the default gateway, the next enabled gateway becomes the default, so parents are never left without one.
- Only live, enabled gateways are offered to parents. Test settings never are.
- The card's Disable for new payments stops new payments through that gateway. Confirmations, refunds and reconciliation of earlier payments carry on.
- Every change on this screen is recorded in the Audit Log with who made it and when. The keys themselves are never written there.
Troubleshooting#
| What you see | What to do |
|---|---|
| A red message at the top of the screen about the school's HTTPS address or a missing key | The ERP is not yet set up to take online payments on this installation. Contact JPRAXC support. A gateway cannot be switched on until this is fixed. |
| Missing requirement: followed by a box name | Fill in that box and save again. |
| Payment configuration is being updated. | Someone else is saving at the same moment. Wait a few seconds and save again. |
| Test connection reports an error | Check that the keys are from the same mode (test or live) as the environment you selected, and that nothing was cut off when copying. |
| The card still says Not configured | Check the Environment list above the cards. It may be showing the other environment. |
