
Write and send mail
Compose a message, add attachments, reply, forward, save drafts and add your photo card.
This guide covers writing a new message in the webmail, replying and forwarding, attaching files and saving drafts. Messages you send are queued and their delivery is tracked in the Outbox.
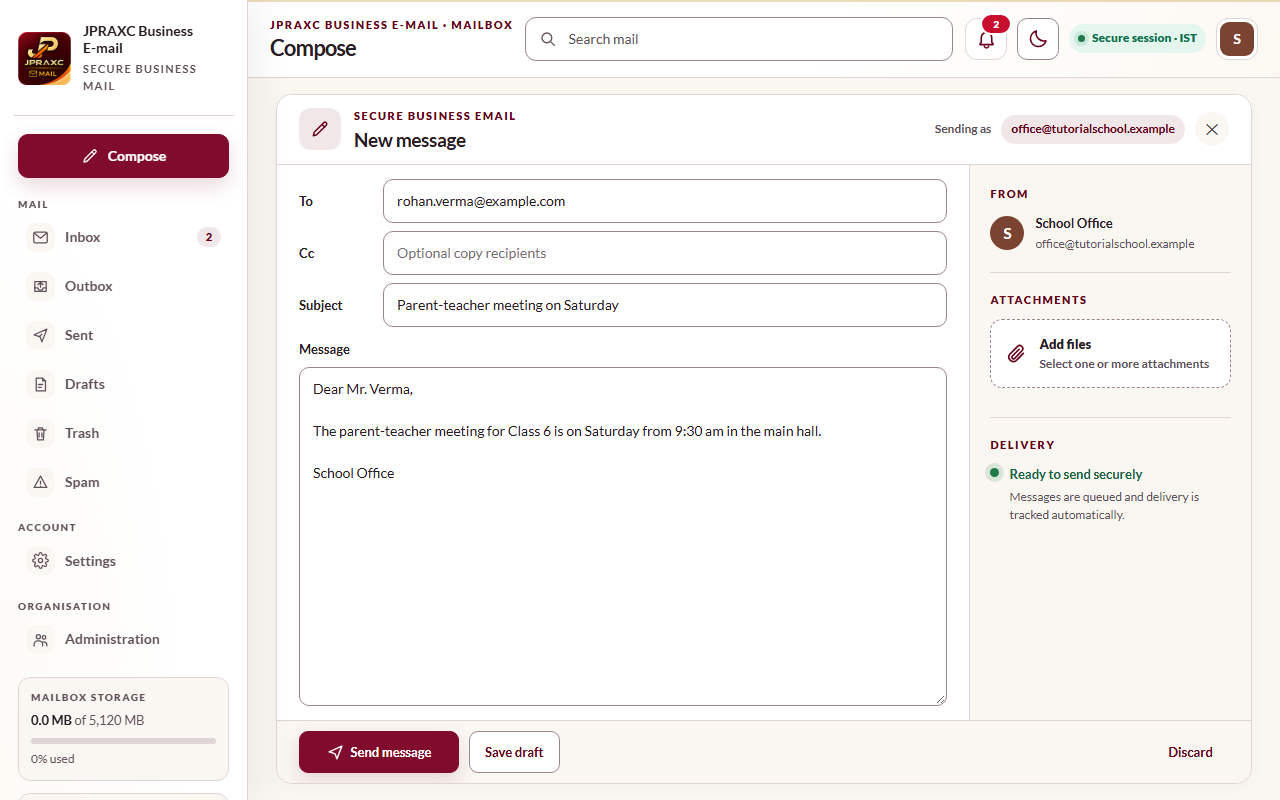
Write a new message#
- Select Compose in the sidebar (or press c in the message list).
- In To, type the recipient's address. For several recipients, separate the addresses with commas.
- In Cc, add anyone who should get a copy (optional).
- In Subject, add a clear subject.
- Write your message in Message.
- To attach files, select Add files under ATTACHMENTS and choose one or more files. Their names appear under the button.
- Select Send message.
The page shows Your message is on its way. and opens Sent. The panel on the right shows Sending as with your own address: every message goes out from the mailbox you are signed in to.
Send without a subject#
If Subject is empty when you select Send message, the webmail asks Send without a subject?
- Yes, send sends it as it is. Recipients see "(no subject)".
- No, add a subject takes you back to the Subject box.
Reply and forward#
- Open the message.
- Select one of these:
- Reply writes back to the sender only.
- Reply all writes to the sender and puts everyone else from To and Cc in Cc (your own address is left out).
- Forward starts a new message for you to address.
- The original text is quoted below your message, with its date and sender. Write above it and select Send message.
Save a draft#
- While writing, select Save draft.
- The message goes to Drafts. A draft can be saved without a recipient.
- To continue, open Drafts and select the draft. It opens in Compose.
- When you send it, the draft is removed from Drafts.
Discard closes the message without saving it.
Add your photo card (signature)#
The webmail has no text-signature setting. Instead, you can add a photo card to the end of every message you send: your photo, name, organisation and address.
- Open Settings.
- Under Profile, add a photo if you have not already.
- Tick Add my photo card at the end of messages I send.
- Select Save changes.
Recipients see the card in Gmail, Outlook, Apple Mail and other inboxes, the way they would see a signature. Untick the box to stop adding it.
Good to know#
- The webmail sends plain text. The JPX Mail app offers formatting; see The JPX Mail app.
- Sending keeps a copy in Sent, and that copy uses your mailbox storage. If your mailbox is full, free some space first.
- A copy in Sent means the message was accepted for sending, not that it was delivered. Check the Outbox if you are unsure. See Track outgoing mail.
- Your organisation's plan includes a number of messages a day. See Sending limits and good sending practice.
Troubleshooting#
| What you see | What to do |
|---|---|
| At least one recipient is required. | Add an address in To or Cc. |
| The address … is not valid. | Check the spelling and remove extra spaces or punctuation between addresses. |
| A message saying one message can address only a limited number of recipients | Split the list into smaller groups. For messages to parents, use the School ERP's communication tools instead. |
| The message with attachments is larger than the platform limit. | Send fewer or smaller files, or share large files another way. |
| There is not enough mailbox storage to keep the Sent copy. Free some space and try again. | Delete old mail, select Empty trash in Trash, and send again. |
| There is not enough mailbox storage to save this draft. | Free some space as above. |
| The organisation has reached its daily sending limit — try again tomorrow or ask the provider to raise it. | Wait until tomorrow, or ask your administrator to buy more messages a day. |
