
Visitors and gate
Check visitors in and out with a printed pass, book visits ahead, keep a watch list, and record who collects each child.
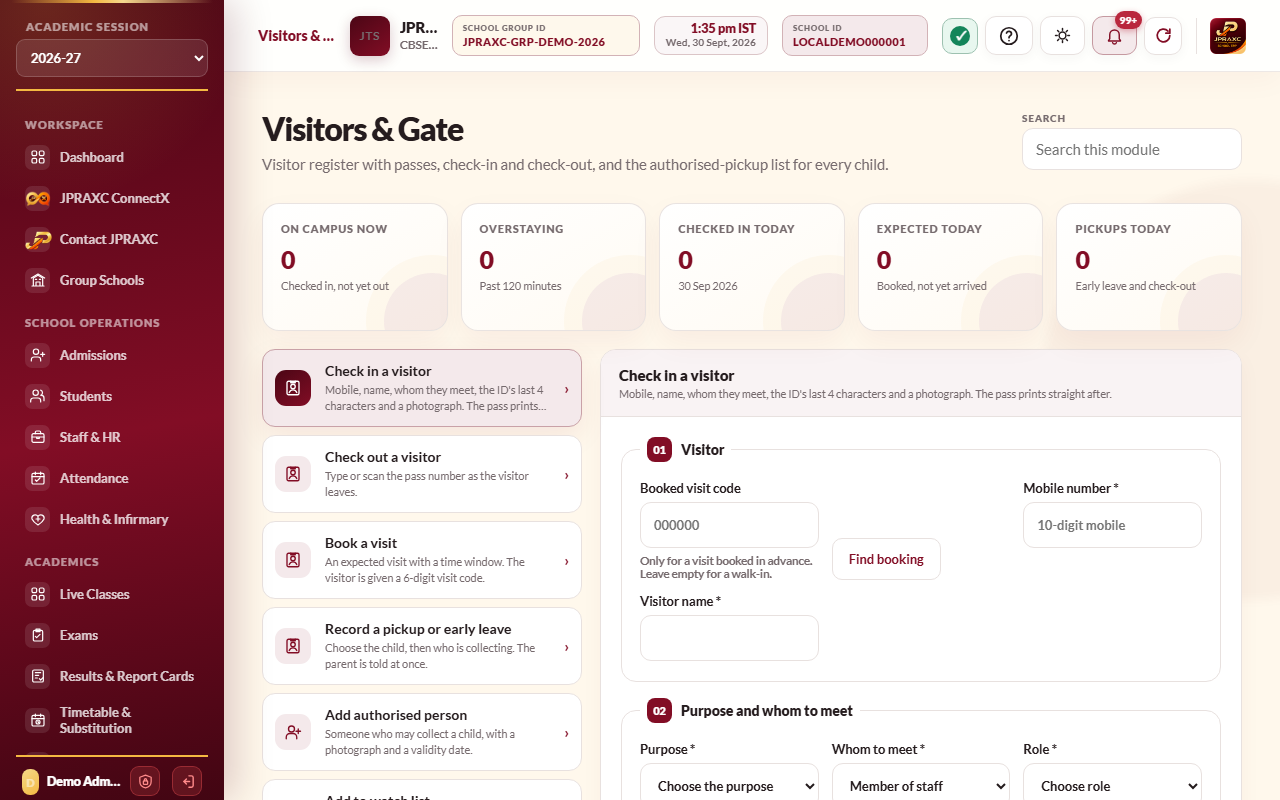
Visitors & Gate is the school's gate register. Every visitor is checked in with their mobile number, whom they have come to meet, the last few characters of their ID and a photograph, and gets a printed pass. They are checked out with the pass as they leave. The same module keeps the list of people allowed to collect each child, records every early leave and pickup, and tells the parent at once.
Before you start#
- Checking in, booking visits, adding authorised persons and recording pickups need the add right for Visitors & Gate; checking out and editing need the edit right; removing an authorised person needs the delete right. The watch list and the settings need the approve right.
- Set the module up once under Settings & privacy (see below).
Check in a visitor#
- Open Visitors & Gate › Check in a visitor.
- For a visit booked in advance, type the 6-digit Booked visit code and select Find booking. For a walk-in, leave it empty.
- Type the Mobile number. If the person has visited before, their name and last visit are filled in.
- Type the Visitor name.
- Choose the Purpose, and whom they have come to meet: a Member of staff, a Parent visit for a student, or the School office.
- Type the number of Persons, and if relevant the Vehicle number.
- Choose the ID proof shown and type only the Last 4 characters of the ID.
- Add the visitor's photograph with Use camera or Upload file.
- Select Check in and print pass. The pass opens for printing.
If the host is a member of staff, they are told in the Staff app that a visitor is at the gate.
Watch list#
If the mobile number is on the school's watch list, a red alert shows the reason it was added. The gate must speak to the office, and must type its own Reason for letting this person in before checking them in. Both reasons are kept in the Audit Log.
Check out a visitor#
- Open Check out a visitor.
- Type the Pass number, scan the pass barcode with a handheld scanner, or select Scan with camera.
- Select Check out. The message shows how long they were on campus, and whether they stayed past the school's overstay limit.
You can also select Check out on a visitor in On campus now, which lists everyone still inside. Visitors past the overstay limit are shown in red.
Book a visit#
- Open Book a visit.
- Type the Visitor name, Mobile number and Persons.
- Set the Visit date, Expected from and Expected until.
- Choose the purpose and whom they will meet, and add any notes for the gate.
- Select Book visit. A 6-digit visit code is shown.
Give the code to the visitor yourself; it is not sent to them automatically. At the gate, the code is typed into Booked visit code. A staff host is told in the Staff app that a visitor is expected. The Booked visit register lists bookings as Expected, Arrived, Cancelled or Missed; Cancel visit stops a code from working.
Authorised pickups#
For each child, the school keeps a list of people who may collect them.
- Open Add authorised person and choose the student by class, section and name.
- Type the person's Name, Relation and Mobile number.
- Optionally set Valid until (for example, the last day of term for a hired driver) and add notes.
- Add their photograph and select Save person.
The Authorised pickup register shows each child's list. Open a child to add, edit or remove people, or select Print pickup card. Cards can also be printed for a whole class or section.
Record a pickup or early leave#
- Open Record a pickup or early leave and choose the student.
- Choose What happened: Early leave or Daily check-out.
- Under Collected by, choose Someone on the authorised list and pick the person. Match their face to the photograph shown before the child goes.
- If the person is not on the list, choose Someone not on the list (override), and fill in their name, relation and mobile, who allowed it (Authorised by (principal / office)) and the Reason for the override.
- Type the reason for an early leave.
- Select Record and notify parent.
The parent is told at once in the Parent app who collected the child and when. For an override, the message says the person is not on the family's authorised list and names who allowed it. People whose Valid until date has passed are not offered.
The Pickup & early leave register lists every pickup by day or month. The Pre-primary check-out register shows, for a chosen day, every pre-primary child and whether they have been collected.
Registers, printing and export#
- Visitor register: every visit by Day, Month or All dates, with pass, visitor, purpose, host, times, status and ID proof. Select Print, or choose an Export format and select Export.
- Watch list register: add a number with its Reason, or Remove it.
- A visitor's pass can be reprinted with Pass.
Settings & privacy#
Under Visitors & Gate › Settings & privacy, set the Pass prefix, the Overstay limit (minutes), whether a Photograph of every visitor is Optional or Required, how long to Keep visitor records for (months), and which purposes are offered at the gate, including your own. Select Save settings.
Troubleshooting#
| Symptom | What to do |
|---|---|
| A pass number is refused at check-out | Check the number. A message says if the pass was already checked out or is not in this school's register. |
| The camera does not open | The camera needs the ERP to be opened securely. Type or scan the pass number instead. |
| Nobody is authorised for this child. | Add the parents and anyone else who may collect the child under Add authorised person, or record an override. |
