
Students
Add students, import a whole roll from a spreadsheet, match photos in bulk, keep documents, export the register and archive students who leave.
The Students module holds one record for every student. The same record is used everywhere: attendance, fees, exams, transport, hostel, ID cards, certificates and the family's portal and app. This guide covers adding students one at a time or from a file, photos and documents, the register, exports and archiving. Promotion at year end is covered in Academic sessions, classes and promotion.
Before you start#
- Your role needs the Students permission.
- Check the Academic session chosen in the sidebar. New students are added to that session.
- The classes, sections and subjects must exist in that session. Transport routes and the hostel must be set up if students will use them.
- A student who applied through Admissions is created by enrolling the application. Do not add them again here. See Admissions.
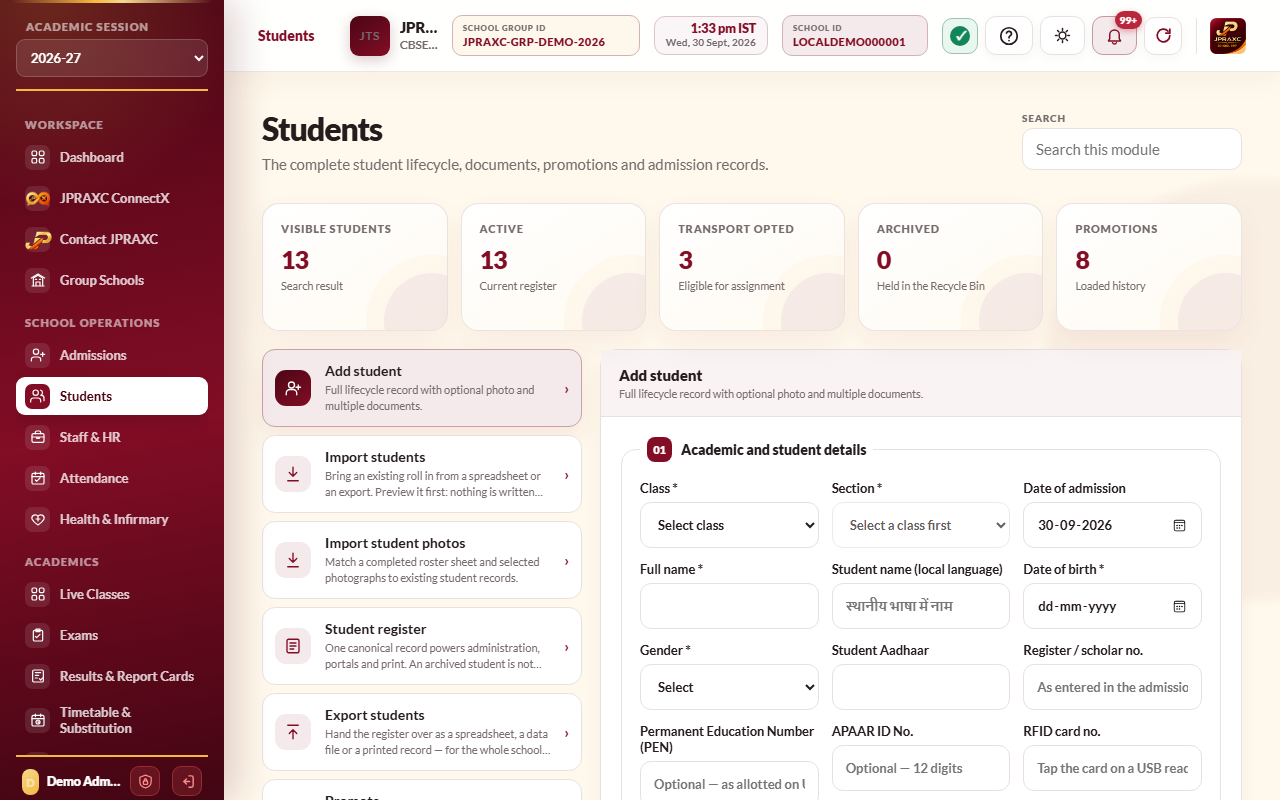
The module has six panes: Add student, Import students, Import student photos, Student register, Export students and Promote.
Add a student#
- Open Students › Add student.
- 01 Academic and student details: choose the Class, then the Section (and the stream for Classes 11 and 12). Check the Date of admission. Fill in Full name, Date of birth, Gender, Religion, Caste category and Minority status. Optional: name in the local language, student Aadhaar, Register / scholar no., national identifiers, RFID card no. (tap the card on a USB reader, or type it) and subjects.
- 02 Parent, guardian and contact details: father's name, mobile and occupation, mother's name and occupation, and optional guardian details, e-mail and address.
- 03 Previous school and transport: choose whether the student uses school transport and pick the route and pickup place, and whether they need a hostel place. For Classes 11 and 12, add the Class 10 board and roll number. Add the previous school if any.
- 04 Photograph, documents and notes: add the photo with Upload file or Use camera, and each supporting document with Add document (give each a name, such as Birth certificate).
- Select Create student.
- The ERP shows the new admission number. Select Preview and print to print the admission form now, or Save to finish.
Admission numbers are always issued by the ERP.
Import a roll from a spreadsheet#
- Open Students › Import students.
- If you need a template, choose a format in Blank format and select Download blank format. Fill it in: one student per row, with the headings in the first row.
- Choose the file in Roll file. The ERP reads CSV, TSV, JSON, Excel .xlsx and OpenDocument .ods files. Save an old .xls file as .xlsx or CSV first.
- Select Preview. Nothing is saved yet. The preview shows which rows will import and, for any that cannot, the reason and the line number in your file.
- Correct problem rows in your file if you want, and preview again.
- Select Import students.
Students are imported into the session chosen in the sidebar. Rows with problems are skipped; the others still import.
The import format#
Full Name is the only required column. These headings are also read:
| Area | Columns |
|---|---|
| Student | Name in Local Language, Class, Section, Date of Birth, Gender, Religion, Caste Category, Category, Minority Status, Aadhaar, Scholar No, RFID Card No, Subjects |
| Father | Father Name, Father Name in Local Language, Father Phone, Father Occupation, Father Aadhaar |
| Mother | Mother Name, Mother Name in Local Language, Mother Phone, Mother Occupation, Mother Aadhaar |
| Contact and transport | Email, Transport Opted, Pickup Point, Address |
| Previous school | Class 10 Roll No, Class 10 Board, TC No, Previous School, Previous School Address, Notes |
Rules to follow:
- Write the Class on every row, the way the ERP names it: a number for Classes 1 to 12 (for example 5), or the pre-primary name (for example LKG). The class and section must already exist in the session.
- Write the Section too. It may be left empty only when the class has a single section.
- Write dates as DD/MM/YYYY or YYYY-MM-DD.
- Write Subjects as subject codes from School Settings › Subject configuration, separated by commas.
- Any admission numbers in the file are ignored; the ERP issues its own.
Example: a row with Full Name Asha Verma, Class 5, Section A, Date of Birth 14/06/2016, Gender Female and Father Name Rakesh Verma.
Add photos in bulk#
- Open Students › Import student photos.
- Download the blank photo roster (Download blank format). It has the columns Admission No, Full Name, Class, Section and Photo File Name.
- Fill in one row per student. Photo File Name must exactly match the name of the image file.
- Choose the completed sheet in Completed photo roster, and select all the images in Photographs (JPEG, PNG or WebP, each within the size shown).
- Select Preview photo matches and check the result.
- Select Import matched photos.
No photo changes until you confirm.
The student register#
Students › Student register lists every active student in the session with admission number, class and section, father and mobile, transport, hostel and status. Filter by class and section, or search by name or admission number.
Each row has:
- Admission form: preview and print the student's admission form.
- Edit: change the record.
- Upload: add or replace the photo and add documents. The documents already on the record are listed in the same window.
- Promote: see Academic sessions, classes and promotion.
- Archive: take the student off the register, with a reason. The student waits in the Recycle Bin.
Aadhaar numbers#
Aadhaar numbers already on a record show masked, as XXXX XXXX followed by the last four digits. A user whose role has Print permission in that module can select Show number beside the field to see the full number in that field. Each reveal is recorded in the Audit Log. Leave a masked number as it is and it is kept unchanged when you save.
Photo changes sent by families#
When a family sends a new profile photo from the Parent app, it arrives as a notification (the bell in the top bar). Open it to see the photo, then select Approve to put it on the record, or Reject with an optional reason the family will see.
Export the register#
- Open Students › Export students.
- In Export, choose Whole school or A class and section, and pick the class and section.
- Choose the Format:
- a data file: Excel workbook (.xlsx), CSV, TSV, JSON, XML, a web page table or a plain text table;
- Printable list with photos (PDF / print);
- Full record per student (PDF / print).
- In Details to export, untick anything you do not want included. The student's name is always included.
- Select Export students.
An exported Excel file keeps its heading row, so it can be imported again. Keep exported files private: they hold personal data.
Archive and restore a student#
- In the Student register, select Archive on the student.
- Type the Reason for archiving and submit.
The student leaves the register and waits in Recycle Bin › Archived records until someone decides. To bring them back, select Restore there. See Approvals and the Audit Log.
Good to know#
- Academic Kundali on the Dashboard opens one student's whole record, for any session, by searching admission number, name, father's name or phone.
- Mobile numbers must be 10-digit Indian mobile numbers.
- Photographs taken with a camera are cropped to portrait and compressed automatically.
- If the school reaches the student capacity on its licence, new students are refused until capacity is expanded. See Storage and purchases.
Troubleshooting#
| Symptom | What to do |
|---|---|
| No name column was found | Head the name column Full Name, Name or Student Name. |
| No class in this row | Write the class and section against every name. |
| Class … is not configured for … | Create that class and section in the session, or check the sidebar session, then preview again. |
| The date of birth could not be understood | Use DD/MM/YYYY or YYYY-MM-DD. |
| Subject code … not in the subject register | Use the codes shown in School Settings › Subject configuration. |
| The old binary .xls format cannot be read | Open the file in Excel and save it as .xlsx or CSV. |
| A student is missing from the register | Check the sidebar session, the class filter and the Recycle Bin. Students who passed out or transferred out are no longer on the active register. |
