
Admissions
Record admission enquiries, take office admissions, review online applications, and approve and enrol students.
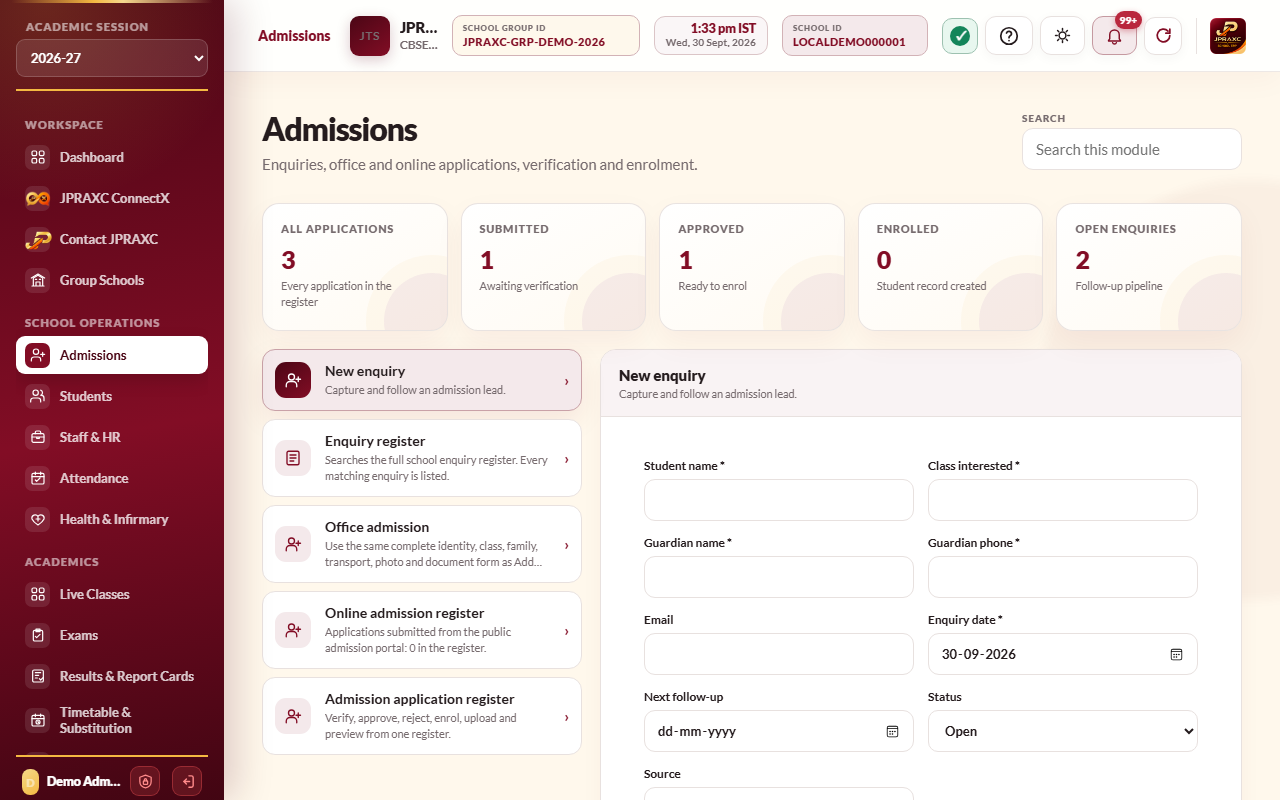
The Admissions module follows a family from the first enquiry to a student record. You can log enquiries and follow-ups, fill in an admission form at the office, review applications that families send through the online admission portal, and approve and enrol an applicant, which creates the student record and admission number.
Before you start#
- Your role needs the Admissions permission.
- The class and section must exist in the academic session chosen in the sidebar. See Academic sessions, classes and promotion.
- Set up transport routes and pickup places, and the hostel, before admissions if families will choose them.
- Online applications need the Cloud edition with the Online Admission portal released in Users & Control › Access control.
The module has five panes: New enquiry, Enquiry register, Office admission, Online admissions and Admission applications.
Record an enquiry#
- Open Admissions › New enquiry.
- Fill in Student name, Class interested, Guardian name and Guardian phone. Add Email if you have it.
- Check the Enquiry date and set Next follow-up if you plan to call back.
- Leave Status on Open, or choose Follow-up or Closed.
- Change Source if the enquiry did not come to the office (for example Walk-in, Phone, Website).
- Add Notes and select Save enquiry.
The Enquiry register lists every enquiry. Search by class, student, guardian, mobile, reference or e-mail, filter by status, and select Edit to update a follow-up.
Take an admission at the office#
- Open Admissions › Office admission.
- If the family made an enquiry, choose it in Linked enquiry. The name, class, father's name, phone, e-mail and notes fill in from it.
- Work down the four numbered sections:
- 01 Academic and student details: Class, Section, stream (for Classes 11 and 12), Full name, Date of birth, Gender, Religion, Caste category, Minority status, subjects, and optional Aadhaar, scholar number and national identifiers.
- 02 Parent, guardian and contact details: father's and mother's names, mobiles and occupations, guardian, e-mail and address.
- 03 Previous school and transport: whether transport is needed and the pickup place, whether a hostel place is needed, Class 10 details where they apply, and the previous school.
- 04 Photograph, documents and declaration: the student's photo (upload a file or use a camera), supporting documents (Add document for each, with a name), notes, and Parent / guardian declaration accepted.
- Select Create office admission.
The application is created with the status Submitted and listed in Admission applications.
Review online applications#
Applications sent by families through the public admission portal are listed separately in Admissions › Online admissions. Search by application number, name, class, parent, mobile, Aadhaar, address or previous school.
On each row:
- Open shows the whole application and its documents.
- Upload attaches papers the family brings to the office.
- Approve & enrol and Reject work as described below.
Approve and enrol an applicant#
- Find the application in Admission applications (office) or Online admissions (online).
- Select Preview or Open and check the details and documents.
- Select Approve & enrol, then Approve.
- The enrolment form opens with the application's details. Check the Class and choose the Section. For an online application, complete the office details.
- Select Enrol student.
The student record is created with a new admission number, and the application's status becomes Enrolled. The student now appears in Students › Student register.
Reject an application#
- Select Reject on the application.
- Type the Reason for rejection and submit.
The reason is shown under the status in the register.
Application statuses#
| Status | Meaning |
|---|---|
| Submitted | Received and waiting for the school. |
| Verified | Details checked. |
| Approved | Accepted. The enrolment form can be completed. |
| Enrolled | The student record has been created. |
| Rejected | Not accepted, with the reason recorded. |
Good to know#
- The figure cards at the top show all applications, those submitted, approved and enrolled, and open enquiries.
- Photographs taken with a camera are cropped and compressed to fit automatically.
- Aadhaar numbers already on a record show masked. See Students.
- If the school has reached the student capacity on its licence, new enrolments are refused until capacity is expanded. See Storage and purchases.
Troubleshooting#
| Symptom | What to do |
|---|---|
| Section stays empty | Choose the Class first. If there is still nothing, create the section for this session in School Settings › Class & section configuration. |
| This admission changed after you opened it | Someone else updated the application. Refresh the module and try again. |
| No online applications arrive | Check that Online Admission is released in Users & Control › Access control, and share the link from Users & Control › Public portals. The Offline edition has no online admission portal. |
| A file will not upload | Use a JPEG, PNG or WebP image for photos, and an image or PDF for documents, within the size shown beside the field. |
